UIBezierPath + CAShapeLayer 实战应用
2017.7.24更新
1. 虚线方法多次调用会重复绘制
解决办法: 使用runtime给类目增加一个属性数组保存绘制的虚线; 在绘制之前移除上一个虚线layer
- (void)addLineOfDashWithRect:(CGRect)rect lineHeight: (CGFloat)lineHeight lineWidth:(CGFloat)lineWidth lineSpacing:(CGFloat)lineSpacing lineColor:(UIColor *)lineColor lineDirection:(BOOL)isHorizonal {
    if (![self lineOfDashArray]) {
        [self setLineOfDashArray:[NSMutableArray array]];
    }
    NSMutableArray *lineOfDashs = [self lineOfDashArray];
    [lineOfDashs enumerateObjectsUsingBlock:^(CALayer *obj, NSUInteger idx, BOOL * _Nonnull stop) {
        [obj removeFromSuperlayer];
    }];
    CAShapeLayer *shapeLayer = [CAShapeLayer layer];
    [shapeLayer setBounds:self.bounds];
    [shapeLayer setPosition:CGPointMake(CGRectGetWidth(self.frame) * 0.5 + CGRectGetMinX(rect), CGRectGetHeight(self.frame) * 0.5 + CGRectGetMinY(rect))];
    [shapeLayer setFillColor:[UIColor clearColor].CGColor];
    //  设置虚线颜色为blackColor
    [shapeLayer setStrokeColor:lineColor.CGColor];
    //  设置虚线高度
    [shapeLayer setLineWidth:lineHeight];
    [shapeLayer setLineJoin:kCALineJoinRound];
    //  设置线宽,线间距
    [shapeLayer setLineDashPattern:[NSArray arrayWithObjects:[NSNumber numberWithInt:lineWidth], [NSNumber numberWithInt:lineSpacing], nil]];
    //  设置路径
    CGMutablePathRef path = CGPathCreateMutable();
    CGPathMoveToPoint(path, NULL, 0, 0);

    if (isHorizonal) {
        CGPathAddLineToPoint(path, NULL,CGRectGetWidth(rect), 0);
    } else {
        CGPathAddLineToPoint(path, NULL, 0, CGRectGetHeight(rect));
    }
    [shapeLayer setPath:path];
    [lineOfDashs addObject:shapeLayer];
    CGPathRelease(path);
    //  把绘制好的虚线添加上来
    [self.layer addSublayer:shapeLayer];
}

- (void)setLineOfDashArray:(NSMutableArray *)lineOfDashArray {
    objc_setAssociatedObject(self, &LineOfDashArrayKey, lineOfDashArray, OBJC_ASSOCIATION_RETAIN_NONATOMIC);
}

- (NSMutableArray *)lineOfDashArray {
    return objc_getAssociatedObject(self, &LineOfDashArrayKey);
}
2. 给顶部进度视图完成的部分扩展点击事件以及增加选中已完成部分的标识
代码地址
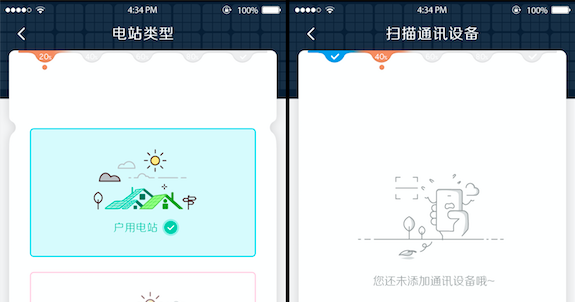
测试阶段完成, 后面进入新功能的迭代; [电站接入]功能的重新设计, 部分效果如上图所示.
分析
经过对效果图的分析, 决定先把能够复用的部分封装起来
- 顶部代表当前进度的视图, 使用贝塞尔曲线绘制
- 视图左右两边的圆弧也使用贝塞尔曲线绘制, 并封装成类目方法
- 绘制虚线


代码实现
1.顶部代表进度的视图
1.1 视图分解
顶部视图可以看成是由5个item组成, 只需要绘制出一个item, 然后再基于该item进行二次封装即可
 1.2 绘制单个item
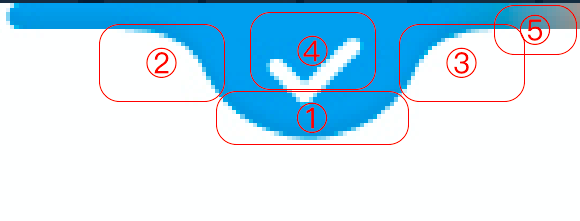 绘制思路:
① : 使用贝塞尔曲线绘制部分圆弧;
②③ :使用二次贝塞尔曲线绘制圆弧
④ : 使用贝塞尔曲线路径绘制对勾
⑤ : 使用CAGradientLayer实现颜色渐变
绘制代码如下:
绘制思路:
① : 使用贝塞尔曲线绘制部分圆弧;
②③ :使用二次贝塞尔曲线绘制圆弧
④ : 使用贝塞尔曲线路径绘制对勾
⑤ : 使用CAGradientLayer实现颜色渐变
绘制代码如下:
- (void)createUI {
    self.backgroundColor = [UIColor whiteColor];
    CGFloat space = 4;
    CGFloat lineHeight = 3;
    CGFloat width = CGRectGetWidth(self.frame);
    CGFloat radius = (width - 2 * space) * 0.16;
    CGFloat controlPointY = 3.3;
    CGFloat startAngle = M_PI * 0.2;
    CGFloat endAngle = M_PI - startAngle;

    UIColor *doneColor = RGB(0, 158, 238);
    UIColor *doingColor = RGB(247, 141, 97);
    //    UIColor *lightDoneColor = RGB(105, 153, 171);
    UIColor *lightDoingColor = RGB(184, 147, 127);
    UIColor *unDoColor = RGB(212, 213, 214);

    UIColor *overalColor = doneColor;
    UIColor *leadingGradientColor = nil;
    UIColor *trailingGradientColor = nil;

    switch (self.processState) {
        case UnProcessState:
            overalColor = unDoColor;
            break;
        case UnProcessRightRornerRadiusState:
            overalColor = unDoColor;
            break;
        case ProcessingLeading:
            overalColor = doingColor;
            leadingGradientColor = doingColor;
            trailingGradientColor = unDoColor;
            break;
        case ProcessingMiddle:
            overalColor = doingColor;
            leadingGradientColor = lightDoingColor;
            trailingGradientColor = unDoColor;
            break;
        case ProcessingTrialing:
            overalColor = doingColor;
            break;
        case ProcessFirtDone:
            overalColor = doneColor;
            trailingGradientColor = lightDoingColor;
            break;
        case ProcessedLeading:
            overalColor = doneColor;
            break;
        case ProcessedMiddle:
            overalColor = doneColor;
            break;
        case ProcessedTrialing:
            overalColor = doneColor;
            trailingGradientColor = lightDoingColor;
            break;
        case ProcessFirtDoing:
            overalColor = doingColor;
            trailingGradientColor = unDoColor;
            break;
        case ProcessLastDone:
            overalColor = doingColor;
            leadingGradientColor = lightDoingColor;
            break;
        default:
            break;
    }
    // 路径
    UIBezierPath *path = [UIBezierPath bezierPathWithArcCenter:CGPointMake(width * 0.5, lineHeight) radius: radius startAngle:startAngle endAngle:endAngle clockwise:YES];
    [path addQuadCurveToPoint:CGPointMake((width - 2 * space) * 0.185 + space, lineHeight) controlPoint:CGPointMake(width * 0.3, controlPointY)];
    // 左圆角
    if (self.processState == ProcessFirtDoing || self.processState == ProcessedLeading || self.processState == ProcessFirtDone) {
        [path addLineToPoint:CGPointMake(space, lineHeight)];
        [path addQuadCurveToPoint:CGPointMake(space, 0) controlPoint:CGPointMake(0 - space, lineHeight * 0.5)];
    } else {
        [path addLineToPoint:CGPointMake(0, lineHeight)];
        [path addLineToPoint:CGPointMake(0, 0)];
    }
    // 右圆角
    if (self.processState == ProcessLastDone || self.processState == UnProcessRightRornerRadiusState) {
        [path addLineToPoint:CGPointMake(width - space, 0)];
        [path addQuadCurveToPoint:CGPointMake(width - space, lineHeight) controlPoint:CGPointMake(width + space, lineHeight * 0.5)];
    } else {
        [path addLineToPoint:CGPointMake(width - 0, 0)];
        [path addLineToPoint:CGPointMake(width - 0, lineHeight)];
    }
    [path addLineToPoint:CGPointMake( width - (width - 2 * space) * 0.185 - space, lineHeight)];
    double endX = cos(startAngle) * radius + (width * 0.5);
    double endY = sin(startAngle) * radius + lineHeight;
    [path addQuadCurveToPoint:CGPointMake(endX, endY) controlPoint:CGPointMake(width * 0.7, controlPointY)];
//    path.lineWidth = 10;
    // 绘制路径图层
    CAShapeLayer *backLayer = [CAShapeLayer layer];
    backLayer.frame = self.bounds;
    backLayer.fillColor =  overalColor.CGColor;
    backLayer.strokeColor  = overalColor.CGColor;
//    backLayer.lineWidth = 2;
    backLayer.lineCap = @"round";
    backLayer.lineJoin = @"round";
    backLayer.path = [path CGPath];
//    backLayer.strokeEnd = 5;
    [self.layer addSublayer:backLayer];

    // 颜色渐变
    CAGradientLayer *gradientLayer =  [CAGradientLayer layer];
    gradientLayer.frame = self.bounds;
    NSMutableArray *colors = [NSMutableArray array];
    [colors addObject:(id)overalColor.CGColor];
    if (trailingGradientColor) {
        [colors addObject:(id)trailingGradientColor.CGColor];
    } else {
        [colors addObject:(id)overalColor.CGColor];
    }
    if (leadingGradientColor) {
        [colors insertObject:(id)leadingGradientColor.CGColor atIndex:0];
    }

    [gradientLayer setColors:colors];
    gradientLayer.startPoint = CGPointMake(0, 0);
    gradientLayer.endPoint = CGPointMake(1, 0);
    if (colors.count == 2) {
        gradientLayer.locations = @[@0.7];
    } else if (colors.count == 3) {
        gradientLayer.locations = @[@0, @0.5];
    }
    [self.layer addSublayer:gradientLayer];
    [gradientLayer setMask:backLayer];

    // 黄色圆圈(标识正在处理)
    if (self.processState == ProcessingTrialing || self.processState == ProcessingMiddle || self.processState == ProcessingLeading || self.processState == ProcessLastDone || self.processState == ProcessFirtDoing) {
        CGFloat cycleRadius = 3;
        UIView *cycleView = [[UIView alloc] init];
        cycleView.backgroundColor = RGB(247, 141, 97);
        [self addSubview:cycleView];
        cycleView.frame = CGRectMake(width * 0.5 - cycleRadius, lineHeight + radius + cycleRadius, cycleRadius * 2, cycleRadius * 2);
        cycleView.layer.cornerRadius = cycleRadius;
    }

    self.titleBtn = [UIButton buttonWithType:UIButtonTypeCustom];
    self.titleBtn.titleLabel.font = [UIFont systemFontOfSize:8];
    [self addSubview:self.titleBtn];
    [self.titleBtn sizeToFit];
    CGPoint titleBtnCenter = self.titleBtn.center;
    titleBtnCenter.x = self.center.x - 5;
    titleBtnCenter.y = lineHeight + 5;
    self.titleBtn.center = CGPointMake(width * 0.5, lineHeight + 3);
    if (self.processState == ProcessedLeading || self.processState == ProcessedMiddle || self.processState == ProcessedTrialing || self.processState == ProcessLastDone) {
        // 已完成的步骤显示√
        UIBezierPath *gouPath = [UIBezierPath bezierPath];
        [gouPath moveToPoint:CGPointMake(12, CGRectGetHeight(self.titleBtn.frame) * 0.5 + 0)];
        [gouPath addLineToPoint:CGPointMake(CGRectGetWidth(self.titleBtn.frame) * 0.5, CGRectGetHeight(self.titleBtn.frame) - 8)];
        [gouPath addLineToPoint:CGPointMake(CGRectGetWidth(self.titleBtn.frame) - 10, 8)];
        CAShapeLayer *gouLayer = [CAShapeLayer layer];
        gouLayer.path = gouPath.CGPath;
        gouLayer.frame = self.titleBtn.bounds;
        gouLayer.lineWidth = 1.5;
        gouLayer.lineCap = @"round";
        gouLayer.lineJoin = @"round";
        gouLayer.fillColor = [UIColor clearColor].CGColor;
        gouLayer.strokeColor = [UIColor whiteColor].CGColor;
        [self.titleBtn.layer addSublayer:gouLayer];

    } else {
        [self.titleBtn setTitle:self.processValue forState:UIControlStateNormal];
    }
}
1.3 基于单个item二次封装 代码如下:
- (void)creatUI {
    CGFloat itemWidth = CGRectGetWidth(self.frame) * 0.2;
    CGFloat itemHeight = CGRectGetHeight(self.frame);
    ProcessState processState = ProcessedLeading;
    for (int i = 0; i < 5; i ++) {
        if (i == self.progressValueType - 1) {
            processState = ProcessedTrialing;
        } else if (i < self.progressValueType) {
            processState = ProcessedMiddle;
        } else if (i == self.progressValueType) {
            processState = ProcessingMiddle;
        } else {
            processState = UnProcessState;
        }

        if (i == 0 && self.progressValueType != ProgressTypeWith40) {
            processState = ProcessedLeading;
        }
        if (i == 0 && self.progressValueType == ProgressTypeWith40) {
            processState = ProcessFirtDone;
        }
        if (i == 4) {
            processState = UnProcessRightRornerRadiusState;
        }

        if (self.progressValueType == ProgressTypeWith20 && i == 0) {
            processState = ProcessFirtDoing;
        }
        if (self.progressValueType == ProgressTypeWith100 && i == 4) {
            processState = ProcessLastDone;
        }
        CreatePlantProgressItme *item = [[CreatePlantProgressItme alloc] initWithFrame:CGRectMake(i * itemWidth, 0, itemWidth, itemHeight) processState:processState processValue:[NSString stringWithFormat:@"%zd%%", (i + 1) * 20]];
        [self addSubview:item];
    }
}
1.4 最终效果
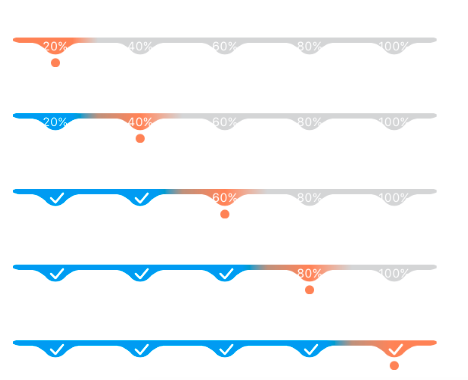
1.5 demo地址 ProgressTopBar
2.视图左右增加圆弧
2.1 直接上代码:(在UIView类目中添加该方法)
/**
 视图View两边增加圆弧

 @param topMargin 距离顶部距离
 @param gapRadius 圆弧大小
 */
- (void)addGapTopMargin:(CGFloat)topMargin gapRadius:(CGFloat)gapRadius {
    UIBezierPath *path = [UIBezierPath bezierPathWithRect:self.bounds];
    UIBezierPath *path1 = [UIBezierPath bezierPath];
    CGFloat gapY = topMargin;
    [path1 moveToPoint:CGPointMake(0, gapY)];
    [path1 addQuadCurveToPoint:CGPointMake(gapRadius, gapY + gapRadius * 1.5) controlPoint:CGPointMake(0, gapY + gapRadius * 1)];
    [path1 addQuadCurveToPoint:CGPointMake(gapRadius, gapY + gapRadius * 3.5) controlPoint:CGPointMake(gapRadius * 2, gapY + gapRadius * 2.5)];
    [path1 addQuadCurveToPoint:CGPointMake(0, gapY + gapRadius * 5) controlPoint:CGPointMake(0, gapY + gapRadius * 4)];
    [path1 fill];

    UIBezierPath *path2 = [UIBezierPath bezierPathWithCGPath:path1.CGPath];
    [path2 applyTransform:CGAffineTransformMakeRotation(M_PI)];
    [path2 applyTransform:CGAffineTransformMakeTranslation(CGRectGetWidth(self.frame), topMargin * 2 + 5 * gapRadius)];
    [path appendPath:[path1 bezierPathByReversingPath]];
    [path appendPath:[path2 bezierPathByReversingPath]];

    CAShapeLayer *shapeLayer = [CAShapeLayer layer];
    shapeLayer.path = path.CGPath;
    [self.layer setMask:shapeLayer];
}
2.2 如何使用:
[self.bgView addGapTopMargin:84 gapRadius:8];
2.3 最终效果


3. 绘制虚线
3.1 同样在UIView类目中添加该方法:
/**
 绘制虚线

 @param rect 虚线尺寸
 @param lineHeight 虚线的高度
 @param lineWidth 虚线的宽度
 @param lineSpacing 虚线的间距
 @param lineColor 虚线的颜色
 @param isHorizonal 水平 | 垂直  (YES 水平; NO 垂直)
 */
- (void)addLineOfDashWithRect:(CGRect)rect lineHeight: (CGFloat)lineHeight lineWidth:(CGFloat)lineWidth lineSpacing:(CGFloat)lineSpacing lineColor:(UIColor *)lineColor lineDirection:(BOOL)isHorizonal {

    CAShapeLayer *shapeLayer = [CAShapeLayer layer];
    [shapeLayer setBounds:self.bounds];
    [shapeLayer setPosition:CGPointMake(CGRectGetWidth(self.frame) * 0.5 + CGRectGetMinX(rect), CGRectGetHeight(self.frame) * 0.5 + CGRectGetMinY(rect))];
    [shapeLayer setFillColor:[UIColor clearColor].CGColor];
    //  设置虚线颜色为blackColor
    [shapeLayer setStrokeColor:lineColor.CGColor];
    //  设置虚线高度
    [shapeLayer setLineWidth:lineHeight];
    [shapeLayer setLineJoin:kCALineJoinRound];
    //  设置线宽,线间距
    [shapeLayer setLineDashPattern:[NSArray arrayWithObjects:[NSNumber numberWithInt:lineWidth], [NSNumber numberWithInt:lineSpacing], nil]];
    //  设置路径
    CGMutablePathRef path = CGPathCreateMutable();
    CGPathMoveToPoint(path, NULL, 0, 0);

    if (isHorizonal) {
        CGPathAddLineToPoint(path, NULL,CGRectGetWidth(rect), 0);
    } else {
        CGPathAddLineToPoint(path, NULL, 0, CGRectGetHeight(rect));
    }
    [shapeLayer setPath:path];
    CGPathRelease(path);
    //  把绘制好的虚线添加上来
    [self.layer addSublayer:shapeLayer];
}
3.2 使用方法
//    [self.bgView addLineOfDashWithRect:CGRectMake(0, 150, self.bgView.bounds.size.width, 2) lineHeight:2 lineWidth:8 lineSpacing:5 lineColor:[UIColor redColor] lineDirection:YES];
    [self.bgView addLineOfDashWithRect:CGRectMake(self.bgView.bounds.size.width * 0.5, 0, 2, self.bgView.bounds.size.height) lineHeight:2 lineWidth:8 lineSpacing:5 lineColor:[UIColor redColor] lineDirection:NO];
3.3 虚线效果


总结
- 颜色渐变
CAGradientLayerCAGradientLayer *gradientLayer = [CAGradientLayer layer]; - 贝塞尔路径的copy(由path1 复制出 path2)
UIBezierPath *path2 = [UIBezierPath bezierPathWithCGPath:path1.CGPath]; - 贝塞尔路径的变换操作(平移, 旋转, 缩放)
[path2 applyTransform:CGAffineTransformMakeRotation(M_PI)]; [path2 applyTransform:CGAffineTransformMakeTranslation(CGRectGetWidth(self.frame), topMargin * 2 + 5 * gapRadius)]; - 裁剪贝塞尔曲线填充的部分
[path appendPath:[path1 bezierPathByReversingPath]]; [path appendPath:[path2 bezierPathByReversingPath]]; CAShapeLayer *shapeLayer = [CAShapeLayer layer]; shapeLayer.path = path.CGPath; [self.layer setMask:shapeLayer]; - 设置虚线
// 设置线宽,线间距 [shapeLayer setLineDashPattern:[NSArray arrayWithObjects:[NSNumber numberWithInt:lineWidth], [NSNumber numberWithInt:lineSpacing], nil]]; -
CALayer 层的动画暂停与恢复
 /**
  暂停layer层的动画

  @param layer
  */
 -(void)pauseLayer:(CALayer*)layer {
     if (layer.speed == 0) return;
     CFTimeInterval pausedTime = [layer convertTime:CACurrentMediaTime() fromLayer:nil];
     layer.speed = 0.0;
     layer.timeOffset = pausedTime;
 }
 /**
  恢复layer层的动画

  @param layer
  */
 -(void)resumeLayer:(CALayer*)layer {
     if (layer.speed != 0) return;
     CFTimeInterval pausedTime = [layer timeOffset];
     layer.speed = 1.0;
     layer.timeOffset = 0.0;
     layer.beginTime = 0.0;
     CFTimeInterval timeSincePause = [layer convertTime:CACurrentMediaTime() fromLayer:nil] - pausedTime;
     layer.beginTime = timeSincePause;
 }